My $2,500 AI Homelab Mistake (And the Workload-First Insight That Saved Me)
Part 1 of 4 in my AI Homelab Build Series
The cloud rate limit notification hit my screen at 2 AM. Again. I'd been throttled for the third time this week trying to run inference tests on a 30B parameter model. The frustration wasn't just about the delay—it was about control. Or the lack of it.
I'd been exploring the local AI market, noticing how untapped it was for small businesses. The opportunities were there: local AI applications that could generate real income, help me understand model tuning at a deeper level, and let me experiment without watching the clock or my AWS bill. But every time I wanted to test something, I hit a wall: instance availability, rate limits, or that sinking feeling when the monthly invoice arrived.
This isn't just about building a GPU box. I'm building a complete AI homelab: a multi-GPU server for compute, Synology DS923+ NAS for dataset storage, and a Goldenmate UPS 1500VA/1200W to protect it all. This is infrastructure, not just a workstation.
Here's what I learned the hard way: most people plan AI builds backwards. They start with specs and budgets instead of workload requirements. That's how you end up with 24GB of VRAM when you need 40GB, or three GPUs when two would have been perfect.
I almost made the same mistakes. This post documents every wrong turn I took—from a $2,500 Framework Desktop that would have been painfully slow, to an RTX 3090 that physically didn't fit my chassis. Part 2 will show you the workload-first framework that saved me. This part? This is what NOT to do.
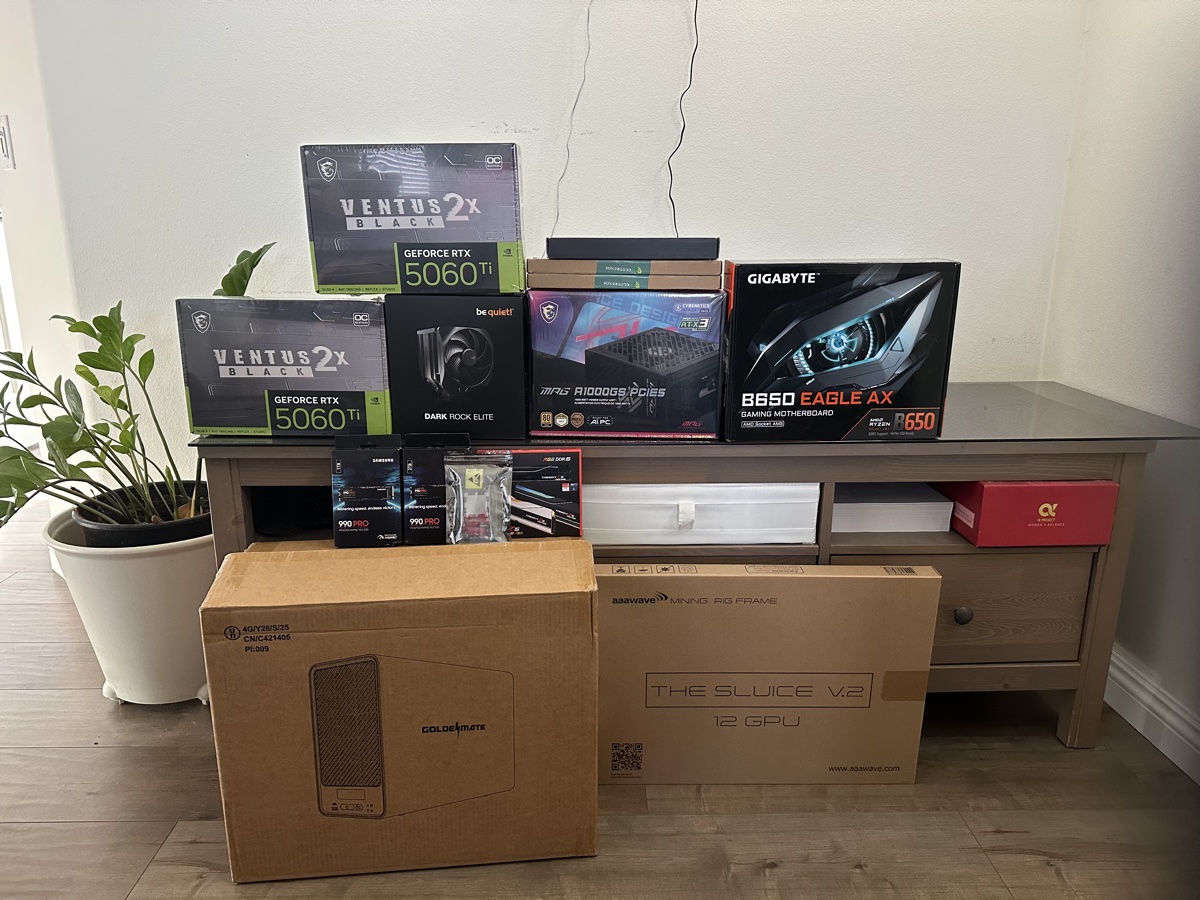 All components ready for assembly: 4× RTX 5060Ti 16GB GPUs, AMD Ryzen 9 9950X CPU, 128GB DDR5 RAM, dual Samsung 990 Pro NVMe drives, GIGABYTE B650 motherboard, MSI 1000W PSU, and aaawave 12GPU open-frame chassis. Total investment: $5,528.
The Planning Journey: From Cloud Frustration to Expensive Mistakes
When Cloud Access Isn't Enough
Cloud rate limits weren't just annoying—they were blocking me from learning and building AI. I wanted to understand AI models deeply: which architectures excel at what tasks, how fine-tuning actually works, what happens when you push batch sizes. But every experiment meant:
- Waiting for instance availability (p3.8xlarge instances aren't always there when you need them)
- Watching costs accumulate ($3.06/hour adds up fast when you're learning)
- Getting throttled during critical inference tests
- Losing momentum when rate limits hit
The real trigger was realizing the local AI market potential. Businesses near me had no idea what local AI could do for them. I saw income opportunities: develop local applications, offer custom model tuning, build AI solutions that don't require cloud dependencies. But I needed ownership, not rental access.
The challenge? Planning overwhelm. GPU options ranged from consumer cards to enterprise hardware. Prices varied wildly. Online advice was contradictory—what worked for someone running Stable Diffusion wouldn't work for me running 70B language models. Budget anxiety kicked in when I realized builds ranged from $3,000 to $30,000+.
The stakes were real: thousands of dollars potentially wasted on incompatible hardware, time lost rebuilding if I got it wrong, and opportunity cost if I couldn't enter the local AI market because my hardware couldn't handle the workloads I planned.
Mistake #1: The Framework Desktop Trap
I started where everyone starts: browsing GPU specs. 3090 vs 4090 vs A6000. Benchmark numbers looked impressive. The 4090 was clearly faster than the 3090. The A6000 had professional driver support. I was swimming in specifications without understanding what actually mattered for my use case.
My first wrong turn: Framework Desktop with 128GB unified memory. Cost: $2,500. Clean, simple, compact. The specs looked perfect—128GB of RAM meant I could load large models, right?
Wrong. Unified memory shares bandwidth between CPU and GPU workloads. For LLM inference, this is significantly slower than dedicated VRAM. The GPU doesn't have its own high-speed memory bus—it's competing with system processes for access to shared RAM. A 30B model might technically fit in 128GB unified memory, but inference would be painfully slow compared to dedicated VRAM.
That "$2,500 affordable solution" became a $5,500 proper AI homelab once I understood the performance gap. Lesson learned: fitting in memory and running efficiently are very different things.
The Framework Desktop looks perfect on paper for general computing. For AI inference with large language models? It would have been a $2,500 mistake.
Mistake #2: The RTX 3090 That Didn't Fit
After abandoning the Framework Desktop, I planned a mixed GPU configuration: one RTX 3090 24GB ($960 used) for large models, plus two RTX 5060Ti 16GB cards ($461 each) for specialized tasks. Total: 56GB VRAM, $1,882.
Then came build day. The RTX 3090 didn't fit.
The aaawave 12GPU open-frame chassis has limited vertical clearance between GPU mounting positions. The RTX 3090's massive 310mm length and 3-slot width design conflicted with spacing for other GPUs. The mounting bracket spacing was designed for standard 2-slot GPUs—the 3090's bulk made multi-GPU installation impossible in this chassis.
The forced pivot: Change to 4× RTX 5060Ti 16GB (all matching cards). New total: 64GB VRAM, $1,844. I gained 8GB VRAM and saved $38 by being forced into a better configuration. All brand-new hardware (no used GPU risks), uniform components (easier management), lower power consumption (660W vs 790W), and better for parallel workloads.
📊 Hardware Change: Planned vs Actual

Key Insight: Physical constraints forced a better configuration. Sometimes limitations guide you to optimal solutions.
Lesson learned: I'd checked PCIe lanes, power requirements, and motherboard compatibility. I forgot to verify the GPUs would physically fit in the chassis with proper spacing. Expensive lesson avoided only because the better solution happened to be cheaper.
Mistake #3: Build Day Surprises
The mistakes didn't end with planning. Build day brought new challenges I hadn't anticipated.
Build day challenge #1: No POST / BIOS not displaying. After assembling everything, the system powered on—fans spinning, lights on—but the monitor stayed black. Motherboard debug LED pointed to RAM. My heart sank thinking I'd bought incompatible components.
The real problem: BIOS incompatibility with Ryzen 9 9950X (Zen 5) and 64GB DDR5 modules. The GIGABYTE B650 motherboard shipped with an older BIOS version that didn't support the latest Zen 5 CPUs or large-capacity DIMMs. Solution: Q-Flash Plus BIOS update (updating firmware without a working CPU). Took an hour to troubleshoot and resolve, but it worked.
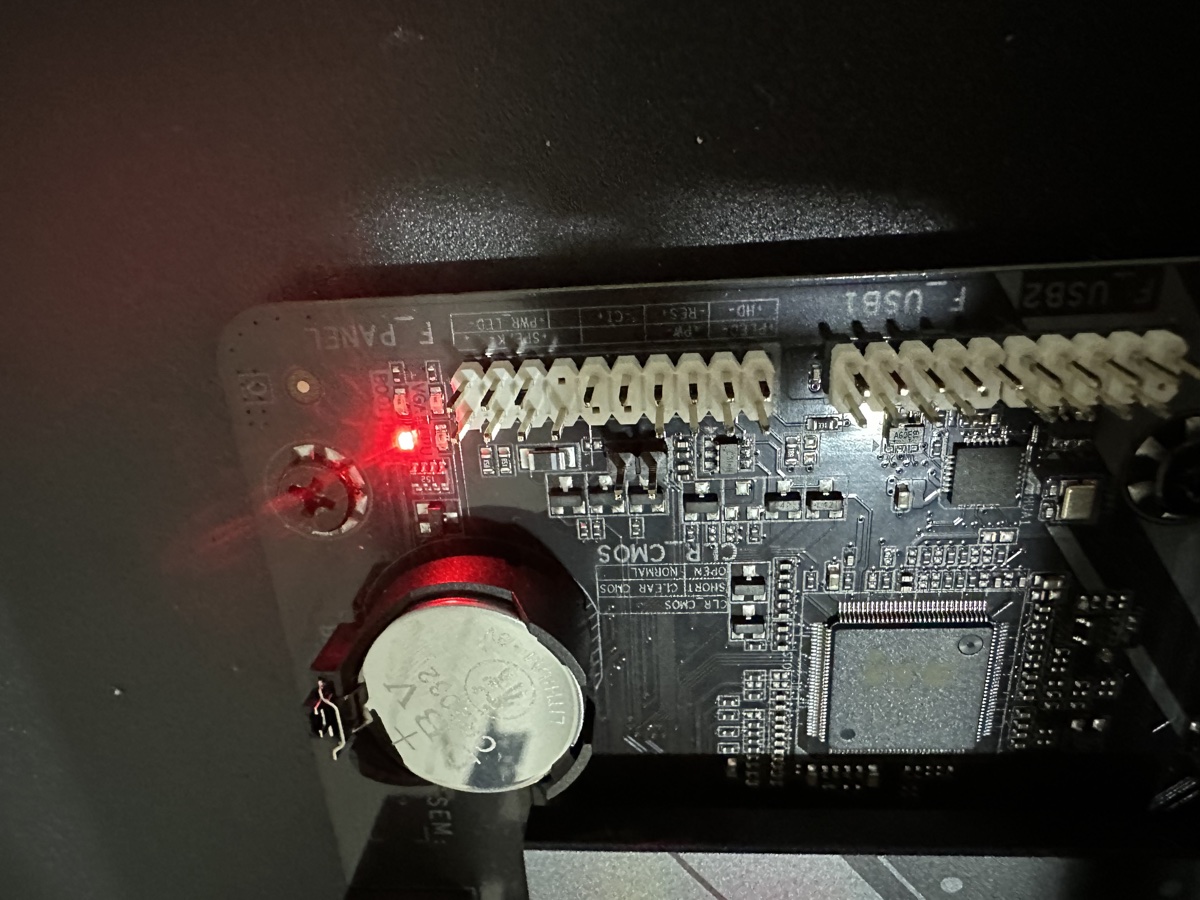 Debug LED pointing to DRAM during first boot attempt. The motherboard's shipped BIOS didn't support Zen 5 CPUs or 64GB DDR5 modules. Q-Flash Plus BIOS update resolved the issue without needing a working CPU.
Lesson learned: Always verify BIOS compatibility with new-generation CPUs before assembly. Check manufacturer websites for supported CPU lists and required BIOS versions. Q-Flash Plus (or USB BIOS Flashback on ASUS boards) is a lifesaver for exactly this scenario.
Build day challenge #2: CPU cooler RAM clearance. The be quiet! Dark Rock Elite Air wouldn't fit in the intended orientation—the G.SKILL Trident Z5 Neo DIMMs (44mm height) blocked fan installation. I rotated the cooler, which actually improved airflow for the open-frame setup. But the 4-pin PWM cable was now too short to reach the CPU_FAN header. Temporary fix: connected to SYS_FAN header. Permanent fix: ordered a $15 PWM extension cable.
Lesson learned: Check cooler specifications for RAM clearance, especially with tall RGB DIMMs.
The Turning Point: From Specs to Workload Math
Initial budget was also wildly optimistic. I calculated GPU + motherboard + RAM + case + PSU and thought, "This is doable." What I forgot: cables, proper cooling solutions, potential electrical work, the open-frame rig. Reddit threads helped, but every recommendation came with different context. Someone running inference-only workloads had completely different needs than someone fine-tuning models.
The turning point came when I stopped looking at GPUs and started with workload math.
I asked the right questions:
- What models do I actually want to run? (7B to 70B parameter range)
- Inference only, or fine-tuning too? (Both)
- What's my target batch size? (Reasonable throughput, not maximum)
I researched memory requirements:
- 7B models: ~14GB for inference, ~20GB for fine-tuning
- 30B models: ~60GB for inference, ~90GB for fine-tuning
- 70B models: ~140GB for inference (quantization required without massive VRAM)
The aha moment: Understanding GPU memory constraints changed everything. This wasn't about comparing benchmark FPS or CUDA cores. It was about capacity thresholds. A 70B parameter model needs roughly 140GB of memory at FP16 precision, plus activation memory and batch overhead. That's ~180GB for comfortable inference.
Suddenly, GPU selection became clear: I needed either multiple high-VRAM cards or accepting quantization trade-offs. No amount of clock speed or tensor cores mattered if the model didn't fit in memory.
Context window size mattered too. Running a coding agent locally requires enough context to hold file contents, function definitions, and conversation history—easily 8K-32K tokens. This meant testing whether smaller models (7B-14B) without quantization would outperform larger models (30B+) with aggressive quantization for my coding use case. More parameters aren't always better if quantization degrades reasoning quality.
What I Learned From These Mistakes
1. Specs Without Context Are Just Numbers
The Framework Desktop had impressive specs: 128GB RAM, modern CPU, compact form factor. For general computing? Great. For AI inference with large models? Significantly slower than dedicated VRAM.
The trap: Assuming bigger numbers = better performance for your specific workload.
The solution: Understand your workload requirements first, then match hardware to those needs.
2. Physical Dimensions Matter As Much As Technical Specs
I obsessively checked PCIe lanes, power requirements, and BIOS compatibility. I completely forgot to measure whether a 310mm, 3-slot GPU would physically fit in a multi-GPU chassis.
The trap: Focusing only on electrical/technical compatibility and ignoring physical constraints.
The solution: Measure everything. GPU length, width (slot count), cooler height vs RAM clearance, case dimensions, motherboard slot spacing.
3. BIOS Versions Are Critical With New Hardware
New-generation CPUs (like Zen 5) and large-capacity RAM modules often require updated BIOS versions that aren't present on boards shipped months earlier.
The trap: Assuming motherboard + CPU socket compatibility = it will work.
The solution: Check manufacturer CPU support lists and required BIOS versions BEFORE buying. Verify your board supports Q-Flash Plus or USB BIOS Flashback for updates without a working CPU.
4. Hidden Costs Add 30-50% to Your Budget
My initial "affordable" build estimate? Wildly optimistic. PSU cables, PWM extensions, BIOS update time, thermal supplies, cable management—these "small" items added up fast.
The trap: Budgeting only for core components (GPU, CPU, RAM, motherboard).
The solution: Add 40% buffer to your initial estimate. You'll probably use it.
5. PCIe Lane Distribution Matters More Than Total Lane Count
Here's a post-build discovery that changed everything: My motherboard has 28 PCIe 4.0 lanes (great!), but the distribution is terrible for multi-GPU:
- Slot 1: x16 (full 32 GB/s bandwidth) ✅
- Slots 2-4: x1 each (only 2 GB/s bandwidth) ⚠️
That's a 16x bandwidth difference between my primary GPU and the other three.
The impact: For my use case (running independent models on each GPU), this is acceptable—models load slower on GPUs 2-4, but inference speed is unaffected once loaded. However, if I ever wanted to do multi-GPU model parallelism or distributed training, slots 2-4 would bottleneck at x1 bandwidth, making it slower than just using GPU 1 alone.
The trap: Checking total PCIe lanes (28 lanes ✅) without checking per-slot allocation (x16/x1/x1/x1 ❌).
The solution: Research exactly how your motherboard distributes PCIe lanes across slots. Desktop motherboards often have 1× x16 slot + multiple x1 slots. For true multi-GPU parallelism, you need x8 minimum per GPU—look for workstation/server boards (TRX50, WRX90) or high-end desktop boards with proper lane splitting.
Why this matters: If your workload requires GPU-to-GPU communication (model parallelism, distributed training), x1 slots are a dealbreaker. If you're running independent models per GPU like I am, it's a minor inconvenience (slower model loading) rather than a showstopper.
6. The "Workload-First" Framework Actually Works
After weeks of chasing specs and benchmarks, switching to workload-first planning clarified everything:
- Define what models you'll run (7B? 70B? Fine-tuning?)
- Calculate actual memory requirements (not guesses)
- Map to GPU options that fit those requirements
- Plan supporting components around GPUs
This framework saved me from the Framework Desktop mistake, guided me past the RTX 3090 compatibility issue, and resulted in a better final build than I originally planned.
What's Next: The Framework That Saved Me
I made expensive mistakes planning my AI homelab. But the workload-first framework I eventually discovered turned planning chaos into clarity.
In Part 2, I'll walk you through the exact framework:
- The 7-step workload-first planning process
- How to calculate GPU memory requirements for your target models
- Budget reality: hidden costs breakdown and the 30-50% rule
- Power and cooling math (before you buy anything)
- Common planning pitfalls and how to avoid them
- My final build specs and why each component was chosen
Part 3 will cover build day: physical assembly, BIOS troubleshooting, first boot, and dual-GPU passthrough configuration.
Part 4 will document the software stack: Proxmox setup, driver installation, Ollama configuration, and the first AI workload running on 64GB of VRAM.
Don't Make My Mistakes
The workload-first approach saved me from:
- ❌ $2,500 Framework Desktop with slow unified memory
- ❌ RTX 3090 that wouldn't fit my chassis
- ❌ Hours of BIOS troubleshooting (could have checked compatibility first)
- ❌ Missing PSU cables and adapters
The result? A better build than I originally planned: 4× RTX 5060Ti (64GB VRAM), $5,528 total, all new hardware, uniform components, and optimized power consumption.
Continue to Part 2: The Workload-First Planning Framework →
For complete technical documentation, planning spreadsheets, and component compatibility matrices, see my ArkNode AI Repository.
Word count: ~2,470 words
Part: 1 of 4 in AI Homelab Build Series
Next: Part 2 - The Workload-First Planning Framework

DuckKingOri
Korean-American firmware engineer in LA. Building AI homelabs, exploring local AI applications, and sharing real experiences with travel, tech, and investing.
Learn more →